Search AquaLots
Find fish, plants, invertebrates and equipment
Discus Breeding Guide
26 March 2026
Discus are the most challenging and most rewarding breeding project in freshwater fishkeeping. The fish are demanding, the process is involved, and the early mortality rates for inexperienced breeders are real. But a productive discus pair raising their own fry — with the juveniles feeding from the parents' skin secretion in the way discus uniquely do — is one of the most extraordinary things you can observe in the hobby. This guide covers everything you need to know to get from a group of juvenile discus to a breeding pair producing viable fry.
In this guide
Before you start — is discus breeding right for you?
Discus (Symphysodon spp.) are the fish that experienced aquarists either love deeply or actively avoid. They are expensive, demanding of water quality, sensitive to stress, and require a level of attention and consistency that exceeds virtually any other commonly kept freshwater species. Breeding them successfully compounds every demand of simply keeping them well.
That said, the rewards are proportional to the investment. A productive discus breeding pair is one of the most commercially viable setups in the freshwater hobby — quality juvenile discus sell for £20 to £80 each at 5 to 8cm, and a productive pair spawning every four to six weeks generates significant income for dedicated breeders. The discus breeding community in the UK is active, knowledgeable, and genuinely supportive of new breeders who approach the hobby seriously.
Before committing to discus breeding, you should already be keeping discus successfully — ideally for at least a year. You should be comfortable with RO water systems and remineralisation, maintaining pristine water quality through frequent water changes, and recognising and treating the common discus health conditions. Discus breeding is an advanced project, not a starting point.
If you're not yet keeping discus and want to start, begin with a care-focused setup and gain experience before attempting breeding. The breeding guide below assumes you are already familiar with discus husbandry basics.
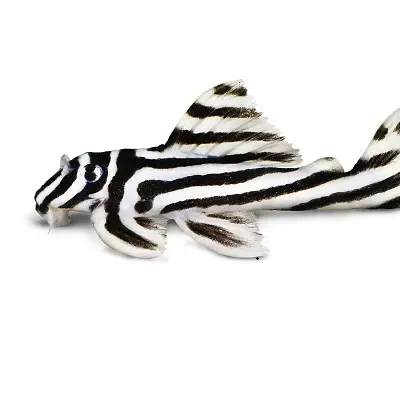
Discus varieties and strain selection
There are three wild species of discus: Symphysodon discus (Heckel discus), S. aequifasciatus (green, brown, and blue discus), and S. haraldi. The vast majority of discus in the UK hobby are captive-bred strains derived from these wild species through decades of selective breeding. These captive strains, while technically the same species, have been developed for specific colours and patterns that don't exist in the wild.
Major strain categories
Pigeon blood — one of the most popular and widely bred discus strains. Characterised by a yellow to orange-red body with dark spotting or peppering. The pigeon blood gene produces the characteristic dark peppering in some light conditions; breeding strategy can either work with or against this depending on the line. Pigeon blood genetics are dominant and significantly affect offspring colour when crossed with other strains.
Blue diamond — solid, intense blue colouration across the body without significant patterning. One of the most striking solid-colour discus. Requires careful line breeding to maintain colour intensity and avoid the brownish wash that appears in lower-quality blue diamond lines.
Red melon / red turquoise — warm red to orange body colouration with varying degrees of turquoise striping or patterning. Very popular in the UK market. High-grade red discus with deep, uniform colour command strong prices.
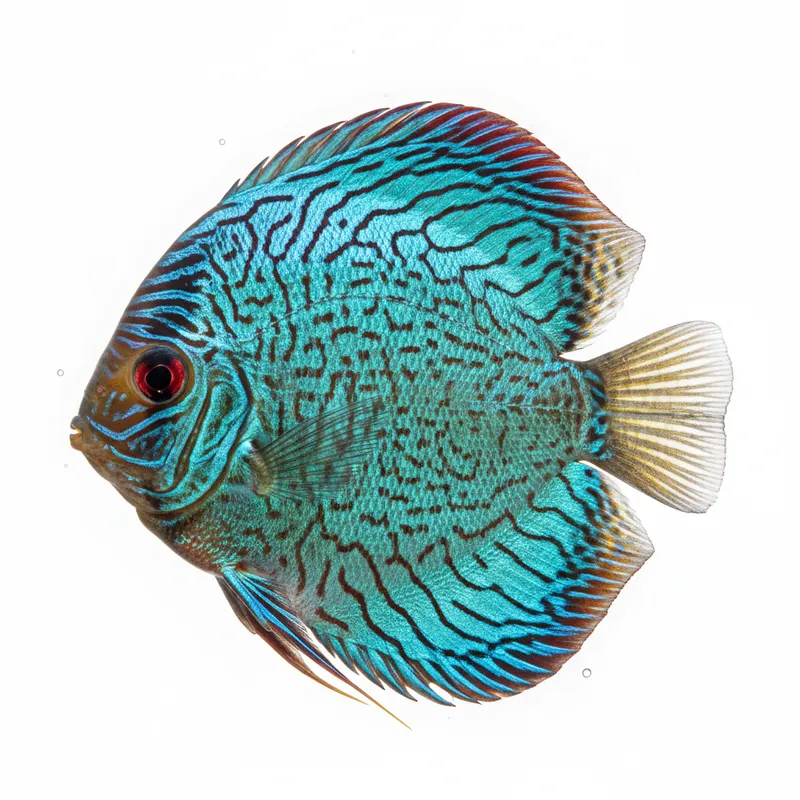
Turquoise strains — multiple varieties with turquoise striping across a darker body. The pattern intensity and regularity of striping is the key grading factor. Wild-type inspired patterns are popular with experienced collectors.
Checkerboard — distinct chequered patterning. A complex pattern to maintain in breeding; the checkerboard expression varies significantly between generations without careful selection.
Albino — pink body with red eyes. Albino discus are a specialist market with dedicated collectors. Breeding albinos requires understanding albino genetics as the trait is recessive.
Heckel discus and wild types — the original wild-caught and F1 captive-bred forms. Increasingly sought after by collectors interested in wild genetics. More demanding than domestic strains in some respects, particularly regarding water chemistry.
Strain selection for breeding
For a first breeding project, established domestic strains (pigeon blood, red melon, blue diamond) are more forgiving than wild-type fish or complex hybrid lines. They have been adapted to captive conditions over many generations and are more tolerant of the imperfections inevitable in early breeding attempts. Choose a strain you find genuinely beautiful — you will be looking at these fish and their offspring for years.
Buy from reputable UK breeders rather than importing. UK-bred discus are acclimated to UK conditions, you can ask detailed questions about water parameters and feeding history, and you have recourse if fish arrive in poor condition. AquaLots lists discus from verified UK sellers and breeders — this is the right starting point for sourcing quality breeding stock.
Sexing discus
Sexing discus is notoriously difficult and is one of the most common sources of frustration for beginners. Unlike many fish where males and females have clearly distinct external characteristics, discus sexes are extremely similar in appearance. There is no reliable colour, fin, or body shape difference that consistently distinguishes males from females across all individuals and strains.
Dorsal fin tube method
The most widely cited sexing method involves examining the breeding tube (papilla) that becomes visible on both sexes when a pair is in breeding condition. The male's tube is narrower and more pointed; the female's is wider and more blunt. This is reliable but requires the fish to be in active breeding condition — tubes are not visible at other times, and examining them requires close observation or temporary removal and inspection of individual fish. It is the definitive method when timing allows it.
Body shape
Males tend to have a slightly more angular forehead profile and in some strains a more pronounced "bump" on the forehead than females. Females may be slightly rounder in the body when approaching breeding condition. These differences are subtle and vary between strains and individuals — they support sexing decisions but should not be used as the sole basis.
Behavioural cues
In a group of discus, behavioural observation over time provides useful sexing information. Males are typically more assertive in displays, initiate chasing behaviour, and position themselves more prominently in the group. These are probabilistic cues rather than certainties, but consistent behaviour over weeks adds to the overall picture.
The practical reality
Most experienced discus breeders acknowledge that reliable sexing before breeding condition is genuinely difficult. The standard approach is to purchase a group of six to eight juveniles and allow natural pair formation, which removes the need for accurate individual sexing entirely. The pair that forms is reliably a male and female — the fish have sorted the problem for you.
Pair formation
Natural pair formation from a group is the most reliable path to a productive discus breeding pair. Purchase six to eight juvenile discus of the same or compatible strains, raise them together, and allow pairs to form naturally as the fish mature.
Signs of pair formation
As discus approach sexual maturity (typically at 12 to 18 months and 10cm+ body size), you will begin to observe pairing behaviour. The pair spend time together away from the group, clean surfaces together (early indication of pre-spawning behaviour), and begin mild aggression toward other group members. The pair's body language — facing each other, mirroring swimming movements, gentle mouthing of each other's bodies — is distinct from the hierarchical interactions within the group.
Once a pair has formed
When a clear pair has emerged, separate them into a dedicated breeding tank before the spawning pressure causes serious aggression toward remaining group members. The remaining fish should be moved to separate grow-out or display tanks. Do not leave a formed pair in a community setting — pre-spawning aggression from the pair toward tank mates escalates significantly as spawning approaches.
Purchasing a proven pair
An established breeding pair from a reputable breeder is a faster route to breeding success but significantly more expensive. A proven pair — one with documented successful spawning history — from a quality breeder can cost £300 to £800 or more. This investment reflects both the fish quality and the certainty of having a confirmed productive pair. Ask the seller for full breeding history: how long together, how many spawns, average clutch size, fry survival rate, and what water parameters and diet have been used. This information is as valuable as the fish themselves.
The breeding tank
The breeding tank for discus is a deliberately simplified setup designed for water quality management, ease of cleaning, and observation. It is not a display tank.
Tank size
A minimum of 100 litres for a single breeding pair, with 150 to 200 litres being more practical. Discus are large fish (adult diameter 15 to 20cm) that need space to establish territory and display. A tank that is too small causes constant stress from proximity, which suppresses breeding.
Bare bottom
Bare-bottom tanks are standard for discus breeding. Substrate traps waste and makes thorough cleaning — essential in discus breeding setups with heavy feeding and frequent water changes — nearly impossible. The bare glass bottom is easy to siphon completely and allows immediate visibility of any waste accumulation.
Minimal decor
The breeding tank needs a spawning cone or surface (see below), a heater, a gentle sponge filter, and nothing else that isn't necessary. Some breeders add a few stem plants or floating plants to reduce stress from bare, exposed conditions — this is reasonable if the plants don't interfere with observation or cleaning. Avoid elaborate hardscape that creates cleaning difficulty.
Lighting
Dim lighting. Discus are more comfortable and breed more readily in lower light conditions. A simple LED on a low setting or positioned to light the tank indirectly is sufficient. Avoid intense overhead lighting that makes the fish feel exposed.
Sponge filtration
Two large sponge filters running simultaneously provide biological filtration without flow that stresses breeding fish or endangers fry. Sponge filters also provide a grazing surface for fry in the early weeks. Do not use power filters or canister filters in a discus breeding tank — the flow is too strong and the intake risk to small fry is real.
Water parameters for breeding
ParameterGeneral keepingBreeding optimumTemperature28 to 30 degrees C29 to 31 degrees CpH6.0 to 7.05.5 to 6.5GH3 to 8 dGH1 to 4 dGHKH1 to 4 dKH0 to 2 dKHTDS100 to 200 ppm50 to 150 ppmAmmonia0 ppm0 ppmNitrite0 ppm0 ppmNitrateBelow 10 ppmBelow 5 ppm
Discus require warmer water than virtually any other commonly kept freshwater species. The 29 to 31 degrees C breeding range is genuinely hot — it suppresses many parasites, accelerates metabolism, and is close to the conditions in the warm, shallow blackwater pools of the Amazon where discus spawn in the wild. Standard tropical heaters set at maximum may not reach these temperatures in cold UK rooms in winter — use a heater rated for higher temperatures or two heaters in the tank.
The very low nitrate requirement — below 5 ppm for optimal breeding — means water changes must be frequent and substantial. Most serious discus breeders change 50 to 80 percent of the water daily in breeding tanks. This sounds extreme but it is the practical requirement for maintaining the water quality discus need to breed reliably and raise healthy fry.
UK water and discus — what you actually need
This is the section most UK discus keepers need to read carefully. UK tap water in most of England is moderately to very hard and neutral to alkaline — exactly the opposite of what discus need. This is not something that can be managed with water conditioners and a dechlorinator. Discus breeding in hard alkaline tap water produces poor egg hatch rates, compromised fry health, and chronic health issues in breeding adults over time.
The solution is a reverse osmosis (RO) unit. RO removes the dissolved minerals from tap water, producing near-pure water that you then remineralise to the correct parameters for discus using a discus-specific mineral supplement. This sounds complicated and is initially an investment, but it is genuinely necessary for serious discus breeding in most UK areas — not an optional upgrade.
RO system basics
A standard three or four-stage under-sink RO unit produces water at roughly 10 to 15 percent of input volume (the rest is waste water) at a very slow flow rate — typically 5 to 15 litres per hour. For a discus breeding setup doing daily 50 percent water changes on a 150-litre tank, you need to produce 75 litres of RO water every day. Plan your RO unit capacity accordingly and use a storage tank.
RO water straight from the unit has zero mineral content and is not safe for discus — it has no buffering capacity and pH can crash unpredictably. Always remineralise with a discus-specific product (Discus Essentials, Discus Mineral Salts, or similar) to achieve the target GH of 2 to 4 dGH and appropriate TDS before use.
Soft water areas
If you're in a naturally soft water area — parts of Scotland, Wales, the North West, and South West of England — your tap water may be usable for discus with only a pH adjustment and dechlorination, without full RO treatment. Test your tap water GH and compare to the target. GH below 5 dGH with pH below 7.0 can work, though RO still produces more consistent results.
Conditioning breeders
Discus conditioning is more demanding than for most cichlids because discus are large, their energy requirements for repeated spawning are significant, and their immune systems are compromised by poor diet faster than hardier species.
Diet for conditioning
Discus are primarily carnivores in the wild, feeding on invertebrates, insect larvae, and small fish. The conditioning diet should reflect this:
Beef heart mix — the traditional discus conditioning food and still widely used by serious breeders. A home-prepared mix of trimmed beef heart blended with supplements (vitamins, spirulina, garlic) provides high protein and fat content that brings discus into breeding condition effectively. Freeze in flat sheets and break off portions for feeding. Make small batches and use within two months.
Frozen bloodworm — high protein, accepted enthusiastically by almost all discus. Feed daily during conditioning.
Frozen white mosquito larvae — excellent conditioning food, high in protein and fat. Less widely available than bloodworm but very effective.
High-quality discus granules or pellets — a reliable base food between live and frozen feedings. Look for formulations with high protein content and natural colour enhancers.
Live earthworms — small earthworm sections are consumed with particular enthusiasm and provide outstanding conditioning benefit. Source from pesticide-free garden soil.
Feeding frequency
Feed three to four times per day during conditioning. Remove uneaten food within 30 minutes every time — discus water quality degrades rapidly with uneaten protein-rich food. The discipline of removing uneaten food promptly is one of the most important habits in discus keeping and becomes even more critical in a breeding setup.
Water change conditioning trigger
Like kribensis and many other cichlids, discus respond to large water changes as a spawning trigger. In their natural habitat, the Amazon flood season brings fresh, cooler, softer water after the dry season — this triggers breeding. Simulate this by performing a large water change (50 percent or more) with slightly cooler RO water, then allowing the tank to return to breeding temperature over several hours. This technique reliably triggers spawning attempts in conditioned pairs.
Spawning cones and surfaces
Discus are open-surface spawners — they deposit eggs on a vertical or angled surface rather than in a cave. The spawning cone is the most commonly used and most reliably accepted spawning surface in discus breeding.
Spawning cones
A ceramic cone approximately 25 to 30cm tall, positioned vertically in the breeding tank. The slightly rough ceramic surface holds eggs reliably, the cone shape allows the parents to position themselves correctly on opposite sides for simultaneous spawning and fertilisation, and the shape is familiar to discus from their natural spawning on submerged plant stems and roots. Commercial spawning cones are available from specialist aquatic suppliers and are inexpensive relative to the overall cost of discus breeding.
Position the cone in a corner or along a wall of the tank, slightly toward the dimmer end of the tank. If the pair consistently ignores the cone, try repositioning it or adding a second cone in a different location.
Alternative spawning surfaces
Some pairs prefer flat vertical surfaces — the side glass of the tank, a piece of smooth slate positioned vertically, or a wide-diameter PVC pipe section. If a pair is consistently spawning on the tank glass rather than the cone, add a slate tile or acrylic panel in that location to give them a manageable surface that you can observe more easily and potentially remove for artificial incubation if needed.
Courtship and spawning
Discus courtship is subtle compared to more dramatically aggressive cichlids, but the behavioural sequence is consistent once you know what to look for.
Early courtship signs
The pair spend increasing time together. They begin cleaning the spawning cone or preferred surface repeatedly — using their mouths to remove algae and debris from the surface. Body shimmer — a rapid, lateral vibration of the body — appears in both fish and intensifies as spawning approaches. The pair circle each other, often with locked mouths in brief gripping displays that establish and confirm the pair bond.
Spawning sequence
The female makes the first pass over the spawning cone, depositing a row of eggs. The male immediately follows the same path, fertilising the eggs. Both fish repeat this in alternating passes over one to two hours, building up a cluster of typically 100 to 400 eggs depending on the female's age and condition. First spawns from young pairs often produce small clutches of 50 to 100 eggs; mature, well-conditioned pairs regularly produce 300 to 400.
During and immediately after spawning, both parents guard the cone intensively. This is not the time to observe closely or disturb the tank. Minimise activity near the tank for the first 24 hours after spawning.
Egg care and incubation
Both parents fan the eggs continuously to oxygenate them and remove infertile eggs, which turn white within 12 to 24 hours. Healthy fertile eggs are translucent to slightly amber-coloured and become darker as the embryo develops.
Incubation period
At 30 degrees C, eggs hatch in approximately 48 to 60 hours. The newly hatched larvae are immobile and attach to the cone surface via a thread from the head. Both parents guard them and may move groups of larvae to different surface locations by mouthing them gently. This wriggling larvae stage lasts two to three days while the yolk sac is absorbed.
Parent-guarded versus artificial incubation
Experienced parent pairs have better hatch rates and fry survival than artificial incubation in most cases. The parents manage the egg surface, oxygenate efficiently, and immediately begin producing the skin secretion (discus milk) that fry will feed from. Leave the parents to manage the eggs unless there is a specific reason not to.
Reasons to attempt artificial incubation: persistent egg eating by one or both parents across multiple spawns, death of a parent, or disease requiring treatment of the main tank. Artificial incubation requires a small container with the spawning cone, RO water at breeding parameters, gentle aeration directly over the eggs, methylene blue added to the water at low concentration to prevent fungal growth, and 50 percent water changes twice daily with matched parameters. Hatch rates from artificial incubation are typically 30 to 70 percent compared to 80 to 95 percent from experienced parent pairs.
Discus milk — the unique fry feeding mechanism
The most extraordinary aspect of discus reproduction — and what makes them unique among commonly kept aquarium fish — is the way fry feed in their first weeks of life. Both parent discus produce a nutritious skin secretion, often called discus milk, that free-swimming fry feed from directly by grazing the parents' flanks. This secretion is a mucus-rich substance produced by specialised skin cells that hypertrophy (enlarge) during the parental care phase specifically in response to the presence of fry.
Free-swimming fry swim directly to the parents and graze their sides. Both parents participate in feeding the fry, and the pair takes turns — one parent holds still while fry feed while the other circulates nearby, then they swap. Parents that are separated from their fry immediately after they become free-swimming show stress behaviours, and fry that cannot access parents for the first two to three weeks have significantly higher mortality rates even when supplemental foods are available.
This unique feeding relationship means that discus fry are genuinely dependent on their parents in ways that most fish fry are not. It is the primary reason discus breeding is managed differently from most cichlid breeding — fry cannot simply be removed to a grow-out tank immediately after becoming free-swimming.
The skin secretion phase typically lasts three to four weeks, gradually reducing as fry grow large enough to eat conventional foods effectively. By four to five weeks, fry are feeding primarily from external food sources and the dependency on parents is significantly reduced.
Fry care and first supplemental foods
From the moment fry become free-swimming, they are simultaneously grazing the parents and capable of taking small external foods. Begin supplemental feeding immediately — the parents cannot produce enough secretion alone for a large clutch of growing fry.
First supplemental foods
Newly hatched baby brine shrimp (BBS) — the essential first food alongside parental secretion. Set up a brine shrimp hatchery before the eggs are laid. Feed three to four times per day in amounts the fry can consume within 20 to 30 minutes. BBS provides the nutrition that bridges the gap between parental secretion and conventional foods.
Micro worms — an excellent supplement to BBS, appropriate size for young fry, easy to culture continuously at home.
Beef heart mix, very finely minced — from around two weeks, very finely processed beef heart mix can be introduced. The parents will eat it too, which is fine — a well-fed parent produces better skin secretion.
Feeding frequency
Feed four to six times per day during the first three weeks. Discus fry grow rapidly when fed frequently and the difference in size between fry fed four times daily and those fed once or twice is dramatic within two weeks. Remove uneaten food within 20 to 30 minutes every feeding — water quality management in a fry tank is critical.
Water changes during the fry stage
Daily water changes of 30 to 50 percent are standard in discus breeding tanks with active fry. The high feeding frequency combined with the metabolic output of both parents and the fry creates rapid nitrate accumulation. Use RO water remineralised to the same parameters as the tank, at the same temperature. Cold water added to a discus fry tank can be fatal.
When and how to separate fry from parents
The timing of fry separation from the parents is one of the most important decisions in discus breeding and one of the most debated among breeders. There are two main approaches with different tradeoffs.
Early separation (two to three weeks)
Fry are moved to a separate tank at two to three weeks, before the parents are ready to spawn again. The fry are supplementary fed only, without access to parental secretion. Pros: parents can spawn again quickly (every four to six weeks with early separation), and you have complete control over fry feeding and water management. Cons: fry separated this early have noticeably higher mortality rates than those kept with parents longer, and early-separated fry are sometimes smaller and less vigorous at equivalent ages.
Late separation (four to six weeks)
Fry remain with parents until the parental secretion phase has largely concluded and fry are feeding primarily from external foods. Pros: fry health and survival rates are significantly better. Cons: the pair cannot spawn again until fry are separated, reducing annual production. This is the approach recommended for breeders prioritising fry quality over breeding frequency.
Separation method
When separating, move the fry rather than the parents — this causes less stress to the parents and allows them to recover and prepare for the next spawn in their established environment. Move fry to a grow-out tank with matched water parameters, at least two large sponge filters, and a bare bottom for easy cleaning. Maintain the same feeding frequency and water change schedule as the breeding tank.
Growing on juveniles
Discus fry grow to 5cm in eight to twelve weeks under good conditions — good meaning frequent feeding, pristine water quality, and the appropriate temperature. Below are the key milestones and benchmarks:
Week 1 to 2 — free-swimming, feeding on parents and BBS. Body beginning to take on the disc shape.
Week 3 to 4 — 1 to 1.5cm. Accepting finely minced beef heart mix alongside BBS. Body colour beginning to develop.
Week 5 to 6 — 2 to 2.5cm. Independently feeding on beef heart mix and small frozen foods. Parental secretion phase concluding.
Week 8 to 10 — 3 to 4cm. Colour and early pattern becoming visible. Accepting quality granules alongside wet foods.
Week 12 to 16 — 5 to 6cm. Approaching juvenile sale size. Strain characteristics clearly visible.
Growth rate is directly correlated with feeding frequency and water change frequency. Breeders who feed six times per day and change 80 percent of the water daily consistently produce larger, healthier juveniles at equivalent ages than those on less intensive schedules.
Sorting and sizing
As juveniles grow, size differences emerge within the clutch. Smaller fish are outcompeted for food by larger siblings and can fall significantly behind. Sort the grow-out tank into similar-sized groups every two to three weeks to ensure even access to food across the cohort. Separate very small individuals into their own container where feeding competition is reduced.
Selling discus
Quality juvenile discus are among the most commercially viable fish a UK home breeder can produce. The market is strong, buyer knowledge is relatively high (discus buyers tend to be experienced and specific about what they want), and quality genuinely commands premium prices in ways that common species do not.
Pricing guide
4 to 5cm juveniles: £15 to £30 depending on strain and quality
5 to 7cm juveniles: £25 to £50
7 to 10cm sub-adults: £40 to £80
10cm+ quality specimens: £60 to £150+
Proven breeding pairs: £300 to £800+
Quality in discus is assessed on: roundness and symmetry of body shape (more circular is more desirable), colour intensity and uniformity, pattern clarity, eye size relative to body (smaller eyes proportionally indicate better growth), fin condition, and overall alertness and activity level. High-grade specimens from established strain lines are at the upper end of these price ranges; lower-grade production fish are at the lower end.
What buyers look for
Discus buyers are typically experienced and ask detailed questions. Be prepared to provide: water parameters the fish have been kept in (RO versus tap, specific pH, GH, TDS, and temperature), feeding history and what foods the fish are currently eating, the parents' strain and whether they are proven breeders, any health treatments the fish have received, and whether the fish are captive bred or imported. Honest, detailed answers to these questions build the trust that converts enquiries into sales and first-time buyers into repeat customers.
Where to sell
AquaLots is the right platform for selling quality UK-bred discus. The audience is fishkeepers who understand what they're looking at, the verified seller system builds credibility over time, and buyer protection makes transactions reliable for both parties. Clear photos showing body shape, colour, and the full group of available juveniles — taken in good lighting that accurately represents colour — are essential. Discus photos that accurately show colour saturation convert significantly better than underexposed or phone-camera images.
Troubleshooting common problems
Eggs turn white and fungus
White eggs within 24 hours are infertile. White eggs spreading beyond the initial infertile ones with a cotton-wool appearance indicate fungal spread from infertile to fertile eggs. The parents typically manage fungal spread by removing affected eggs, but in early or inexperienced pairs this management may be insufficient. Adding a very small amount of methylene blue to the tank water (to the faint blue tinge only) reduces fungal pressure. Improving water quality and checking that the male is actually fertilising eggs (watch the spawning sequence closely) addresses the root cause.
Egg eating
New pairs frequently eat their first several spawns. This is normal and usually self-resolving with subsequent spawns as parental instinct consolidates. Causes of persistent egg eating: excessive disturbance or stress near the tank, predator presence (even the keeper's face close to the glass can trigger it in sensitive pairs), poor water quality, and malnourishment. Reduce disturbance, improve conditions, and allow the pair to continue trying. Most persistent egg eaters resolve within four to six spawns. If eating continues beyond eight to ten attempts, consider artificial incubation as the default approach for that pair.
Fry not finding parents
Free-swimming fry that cannot locate parents will school in a corner or near the surface, fail to feed, and deteriorate rapidly. This sometimes happens when parents move fry between surfaces and fry become detached. Ensure the tank has no strong currents that sweep fry away from parents. If fry are found isolated, gently herd them back toward the parents with a net used as a guide rather than a capture tool.
One parent attacking the other
Inter-partner aggression occasionally erupts in discus pairs during the parental care phase. One parent — usually the male — may begin attacking the other. Temporarily divide the tank with a mesh partition to allow both parents visual and olfactory contact with fry while preventing physical injury. In most cases the aggression reduces within two to three days. If it persists, the male can be removed entirely and the female managed as a single parent — discus females can raise fry alone, though secretion production is reduced.
Fry not growing
Stunted fry growth almost always traces to one of three causes: insufficient feeding frequency, water quality issues (elevated nitrate or ammonia suppresses growth), or temperature below the optimal range. Increase feeding to four to six times daily, step up water change frequency, and verify temperature is at 29 to 30 degrees C. Growth response to improved conditions is usually visible within two weeks.
Discus breeding is a long game. The first spawn is rarely the best, the first fry are rarely the healthiest, and the first sale is rarely the most profitable. Experience with a specific pair, in a specific setup, with established routines compounds over time into a genuinely productive and rewarding breeding operation. The keepers who succeed with discus long-term are the ones who approach each spawning attempt as a learning experience and adjust based on what they observe.